Sample Capture
A helper tool for recording short sounds [2025]
This utility device for Ableton Live makes recording of sample percussions very easy. Capturing, auto-editing, naming and saving is all done with a few button presses. If you ever wanted to grab twenty different percussion sounds from your modular rig without tedious editing, this is your friend.
You can download the Max for Live device here: [Download Link]. It has been tested with Ableton Live Suite 12, but might also work in earlier versions of Live.
Recording
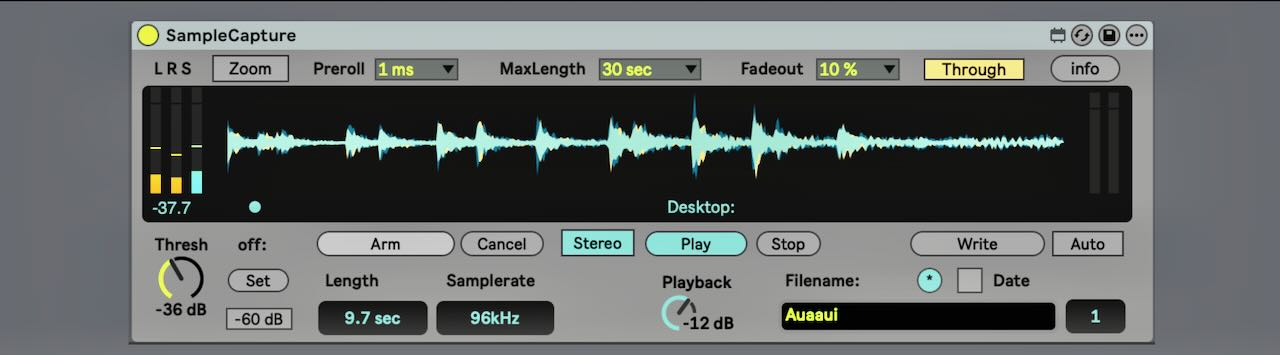
The device records whatever signal is fed into its input. By default, it writes recordings to the desktop, but you can drag an empty folder onto the display to change the destination. Currently, this only works from the Finder (on macOS) and not from Live’s browser.
Recording begins when (Arm) is pressed and the input signal exceeds the Threshold level. It stops when either the maximum recording time (set via MaxLength) is reached, the input level drops below the Off Threshold, or when (Cancel) is pressed.
The Off Threshold can be set using the (Set) button, which places it 3 dB above the signal level present at the moment you press it. Typically, this corresponds to the noise floor when recording from a microphone.
The Preroll parameter allows you to capture a short amount of time before the Threshold is reached. This helps when recording sounds with a slow attack, ensuring the transient isn’t cut off. After recording, the sample is normalised and a fade-out is applied. The Fadeout chooser allows you to set this between 0% and 50% of the total length.
Press (Play) to audition the captured sample. Recording is always done in stereo; however, when auditioning or saving, you can choose between mono and stereo output.
When Through is enabled, the input signal is passed directly to the output unless a recording is being auditioned, in which case the inupt is muted.
Naming
Saved files use the chosen base name followed by an incrementing number. You don’t need to rename each take manually and that's ideal if you don’t want to type “snare-101”, “snare-102”, and so on.
The name can be randomly generated (with or without a date prefix) or set manually.
The random naming algorithm tends toward a playful pseudo–Gaelic–Pan-Asian flavour. If musical inspiration stalls, you can always spend an afternoon clicking through random names.
The device prominently displays the recording sample rate and the duration of the most recent take. Recording at 96 kHz is recommended for sounds that might be pitched down a lot at a later stage.
The meters on the left display the left and right input levels, as well as their difference. If the third meter shows nothing, the input is fully mono with identical left and right levels; such material should be saved as mono.
Auto Arm
When [Auto] is enabled, the device automatically returns to the (Arm) state after saving. This makes recording multiple sounds in sequence more streamlined: press (Arm) once, capture the sound, wait for processing, press (Save), and the device is immediately ready for the next take.
I made the first version of this device in 2015 for my own needs, and rewrote it completely in December 2025. It has been tested and should work, but if there are issues, get in touch.
Screenshot of the device made using a custom Live 12 color theme. You can grab it from here: roberthenke-live12-theme.zip